To enable data collection and use the alerting or the MyDataSecurity/MyDataManagement platform by your users, we invite you to fulfill the five prerequisites below.
To collect your on-premises server, IDECSI uses a LEM (Local Extractor Module) as a proxy between your local on-premises server and the SAAS monitoring platform. A local service account requests all information collected by IDECSI via Powershell commands.
Creating the VM
For Exchange
To be fully operational for the protection of users, the LEM needs to be installed on a VM with the following hardware configuration:
- RAM 8 Gb
- CPU 1 core
- Disk 100 Gb
The LEM collector can run on the following operating systems:
- Windows Server 2016 Standard 64bits
- Windows Server 2019 Standard 64bits
Once the VM is created, please install Microsoft Framework .net 4.8.
Your Client Success manager will send you an email with your WorkerID and the setup.exe file to install the LEM software on the VM.
For SharePoint
We need to size the LEM specs according to your infrastructure, please provide us the following information about your SharePoint volumetry:
- Number of nodes
- Number of sites
- The average volume of data stored on your Sharepoint
Once this information is provided, we will provide a full specs list to create the LEM in your environment.
Opening flows
Please, verify or open the following connections:
From | To | Protocol |
I2A VM (LEM) | I2A Data Center (Internet) | TCP 443 |
I2A VM (LEM) | All Exchange 2010/2013 servers with the Client Access Server role | TCP 80 |
I2A VM (LEM) | Active Directory Controller | TCP & UDP 389 |
I2A VM (LEM) | https://updates.i-2a.com/lem/wyserver.wys | TCP 443 |
I2A VM (LEM) | Each SharePoint | TCP 443 |
User’s Desktop | I2A Data Center (Internet) | TCP 443 |
Installing the LEM
Launch the setup.exe on the VM and proceed with the installation.
To validate the choice of the local system account versus a custom one, please read below.
Adding the proxy, 4 cases:
- No proxy: Use Local System into the LEM setup, use system default settings in the proxy configuration. Then go to Check the service account.
- Proxy but not authenticated: Use Local System into the LEM setup and use Custom Proxy settings in the proxy configuration.
Fill the URI (http://), port and set the Bypass (usually true)
Then go to Check the service account. - Proxy authenticated with the same account as the I2A service account: Use Custom User in the LEM setup and fill in the fields and use Custom Proxy settings in the proxy configuration.
Fill the URI (http://), port and set the Bypass (usually true)
Then go to Check the service account. - Proxy authenticated with another account:
- The account used for the proxy is in the same domain as the LEM: Use Custom User in the LEM setup, fill in the fields, and use Custom Proxy settings in the proxy configuration. Fill the URI and set the Bypass (usually true)
- The account used for the proxy is in a different domain than the LEM: Use the Local System and edit the settings files. Edit the proxy.config file and replace file content with:
<?xml version="1.0" encoding="utf-8" ?>
<defaultProxy>
<module type="ID.SABA.Infrastructure.CustomProxy, ID.SABA.Common" />
</defaultProxy>
Edit the file settings.json just after the opening bracket { and copy-paste the following (with commas):
"CustomProxy.Login": "login",
"CustomProxy.Password": "password",
"CustomProxy.ProxyAddress": "http://hostname:port",
Checking the service account
At the end of the installation, you must open the MMC, stop the I2A Worker service, and set the service account login/password on it.
Then restart the I2A Worker service.
Validate the NTFS rights of the service account.
[Optional] Installing the LEM (Silent mode)
A Silent mode is available to install IDECSI LEM.
i.e.: I2AWorker 4.8.18303.0121.exe /SILENT /WorkerId=00000000-0000-0000-0000-000000000000 /IsCustomAccount=true /Username=”idecsi\svc_lem” /Password=”Password12345″
If you wish to include in a parameter a comma, vertical bar (“|”), or closing brace (“}”) inside the constant, you must escape it via “%-encoding.” Replace the character with a “%” character, followed by its two-digit hex code. A comma is “%2c”, a vertical bar is “%7c”, and a closing brace is “%7d”. If you want to include an actual “%” character, use “%25”.
Parameters
/SILENT, /VERYSILENT
Instructs Setup to be silent or very silent. When Setup is silent, the wizard and the background window are not displayed but the installation progress window is. When a setup is very silent this installation progress window is not displayed.
I2A worker parameters
/WorkerId=00000000-0000-0000-0000-000000000000
/IsCustomAccount=true|false (If necessary, Default: False)
/Username=”idecsi\svc_lem” (If IsCustomAccount = True)
/Password=”Password12345″ (If IsCustomAccount = True)
/IsCustomProxy=true|false (If necessary, Default: False)
/ProxyAddress=”http://proxy.domain.com:3128″ (If IsCustomProxy = True)
/ProxyBypassLocal=true|false (If IsCustomProxy = True)
The solution uses an Exchange service account to collect configuration objects on Exchange and to perform remediation.
You can use the script below to create the service account and roles and assign cmdlets automatically.
Please send the login/password to clientsuccess@idecsi.com (passwords can be sent using 1ty.me – One Time Self Destructing Links For Sharing Sensitive Information).
Using PowerShell :
# Connexion Exchange
$credentials = Get-Credential
Import-Module ActiveDirectory

# Création du compte de service
New-ADUser –SamAccountName "svc_lem" -GivenName "I2A" -Surname "LEM" -DisplayName "LEM I2A" –name "LEM I2A" -Path "OU=Service Account,OU=Idecsi,DC=idecsi,DC=siege" –AccountPassword (Read-Host -AsSecureString "AccountPassword") –CannotChangePassword $true –ChangePasswordAtLogon $false -Enabled $true –PasswordNeverExpires $true
Using Exchange PowerShell :
# Connexion Exchange
$credentials = Get-Credential
Import-Module ActiveDirectory

# Création du compte de service
New-ADUser –SamAccountName "svc_lem" -GivenName "I2A" -Surname "LEM" -DisplayName "LEM I2A" –name "LEM I2A" -Path "OU=Service Account,OU=Idecsi,DC=idecsi,DC=siege" –AccountPassword (Read-Host -AsSecureString "AccountPassword") –CannotChangePassword $true –ChangePasswordAtLogon $false -Enabled $true –PasswordNeverExpires $true

# Définition des variables
$serviceAccountName = "svc_lem"
$roleGroupName = "I2A"
$roleName = "Mail Recipients - ViewOnly - I2A"
$roleName1 = "Remediation - I2A"
$roleName2 = "Remediation 2 - I2A"

# Création Role group "Mail Recipients - ViewOnly - I2A" - Droits de base
New-ManagementRole $roleName -Parent "Mail Recipients"
Get-ManagementRoleEntry ($roleName + "\*")
$data2 = Get-ManagementRoleEntry ($roleName + "\*")
foreach($data in $data2)
{
$name = ""
$name = $data.Name
if($name -NotLike "Get*")
{
Remove-ManagementRoleEntry $roleName\$name -confirm:$false
Write-Host ("done for $name")
}
}

# Création Role Group "Remédiation - I2A" - Droits remédiation 1
New-ManagementRole $roleName1 -Parent "Mail Recipients"
Get-ManagementRoleEntry ($roleName1 + "\*")
$entries = Get-ManagementRoleEntry ($roleName1 + "\*")
foreach($entry in $entries)
{
$name = ""
$name = $entry.Name
if ($name -NotLike "Remove-MailboxPermission" -And $name -NotLike "Remove-InboxRule" -And $name -NotLike "Remove-MailboxFolderPermission" -And $name -NotLike "Remove-RecipientPermission" -And $name -NotLike "Remove-ADPermission")
{
Remove-ManagementRoleEntry $roleName1\$name -Confirm:$false
Write-Host ("done for $name")
}
}

# Création Role Group "Remediation 2 - I2A" - Droits remédiation 2
New-ManagementRole $roleName2 -Parent "Mail Recipient Creation"
Get-ManagementRoleEntry ($roleName2 + "\*")
$entries = Get-ManagementRoleEntry ($roleName2 + "\*")
foreach($entry in $entries)
{
$name = ""
$name = $entry.Name
if ($name -NotLike "Set-MailboxFolderPermission")
{
Remove-ManagementRoleEntry $roleName2\$name -Confirm:$false
Write-Host ("done for $name")
}
}

Get-ManagementRoleEntry ($roleName + "\*")
Get-ManagementRoleEntry ($roleName1 + "\*")
Get-ManagementRoleEntry ($roleName2 + "\*")

New-RoleGroup -Name $roleGroupName -Roles "Audit Logs","View-Only Configuration","View-Only Recipients",$roleName,$roleName1,$roleName2 -Members $serviceAccountName
To monitor your SharePoint On-Premise environment, we will need:
- A technical account with sufficient levels
- A “farm solution” to be installed in your farm server
Service Account and farm information
IDECSI will need a service account to run services through the LEM and request information about your site collections. Here are the information that you will need to provide.
The service account created must be a Farm Administrator account. Please provide us:
- Domain
- Login
- Password
As IDECSI is multi-farm compliant, please also provide us with the following information:
- FarmID
# Sharepoint Management shell
Get-SPFarm | Format-Table -PropertyId, EncondedFarmId, Name, DisplayName, Status- “Main URL” for FarmSolutions API (ie: contoso.sharepoint.com)
Farm solution
We also need to access several pieces of information. Some of this information is provided by Sharepoint by default, some aren’t.
To obtain the latter, IDECSI developed a Farm Solution plugin that you must install on your farm summary.
Once the information on the volumetry and the service account is provided to IDECSI, we will provide you with the WSP file to install on your farm summary.
- Install the Farm Solution: you will find a tutorial here
- Check the status of the Farm Solution on your environment :
Open the Central Admin and go to “System Settings” from the left navigation. Now, select “Manage Farm Solutions” to check the status of your solution. - (If needed) Update the Farm Solution:
# ServerSide
Update-SPSolution -Identity ID.SABA.Providers.Microsoft.SharePoint.OnPremise.Package.2019.wsp - LiteralPath E:\SharepointFarmSolution\ID.SABA.Providers.Microsoft.SharePoint.OnPremise.Package.2019.wsp - GACDeployment
To enable users to connect to their MyDataSecurity or MyDataManagement, we can integrate your identity federation. Below is the procedure with Azure AD. For other solutions, please consult the knowledge base.
| 1. Go to your administrator Dashboard in Azure Active Directory | |
| and click on Active Directory > Enterprise Applications | 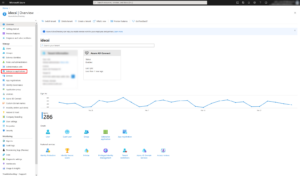 |
| 2. Click + Create your own application | 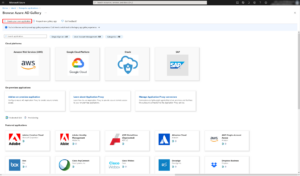 |
| Type a relevant name in Input Name (ie I2A Platform), select the “Integrate any other application you don’t find in the gallery (non-gallery)” option, and click Create. | 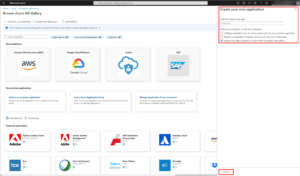 |
| 3. After this, you’re redirected to the newly created application Overview, go to Assign users and groups from the tile or the side menu. | 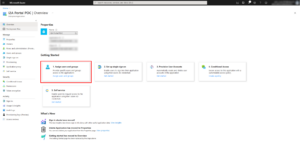 |
| 4. If you want to restrain the usage, you can add users and/or groups you want to access the I2A platform. We recommend adding a group with all your tenant users, I2A will recognize the users with an account. | 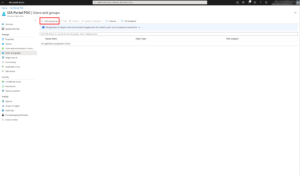 |
| 5. Go to Single sign-on from the side menu and select SAML as the single sign-on method. | 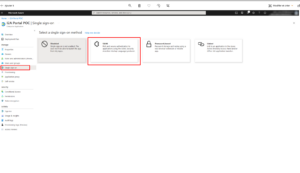 |
| 6. Click on Upload metadata file and select the XML file provided by your Client Success Manager. | 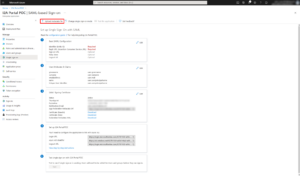 |
| 7. After the import, you’ll have: | 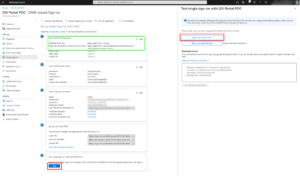 |
In the Basic SAML configuration block: Identifier (Entity ID): https://dcxx-auth.i-2a.com You can now test your authentication using the Test button. | |
| 8. Please send us the Federation metadata XML file to clientsuccess@idecsi.com | 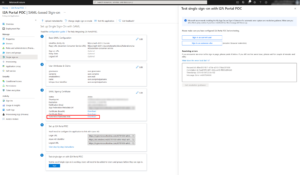 |
Your Client Success Manager will inform you after your metadata has been integrated.
To encourage users to adopt the solution, we propose the use of an application that will enable our platform to send e-mails from your Microsoft tenant. If not, IDECSI will use Graph API to send emails from a generic address (alerts@idecsi.com).
If you want to use a particular email address of your domain, we can use the Microsoft Graph API to send IDECSI emails through an application granted on your tenant.
IDECSI proposes to use the generic application “I2A Mail Sender” to send notifications.
The application used to send notifications cannot be the same as the one used for the remediation, as the permission “Mail.Send” must be scoped on the account.
Step 1: Grant permission to this application
The following step is to grant the application with Global Administrator rights. Here is the link to grant the generic IDECSI managed app :
https://login.microsoftonline.com/common/adminConsent?client_id=ba28a8f5-601a-4523-a7e9-570dc40d49d7
The only permission to be granted is:
| Permission | Display String | Description | Admin Consent required |
| Mail.Send | Send mail as a user | Allows the app to send mail as users in the organization | Yes |
More information on the permission: Microsoft Graph permissions reference – Microsoft Graph | Microsoft Docs
Step 2: Enforce a restriction policy to limit the scope of the permission
To guarantee the best possible security, and to limit the permissions of the application granted in step 2, it is necessary to limit the right to send mail to a single service account used for this purpose.
For this, it is necessary to create an ApplicationAccessPolicy.
#0. Select the application you want to configure:

$myAppId = {my app id}

#1. Connect to Exchange Online with the ExchangeOnlineManagement PowerShell module

Connect-ExchangeOnline

#2. Create a mail-enabled security group that contains all the accounts you want to send mails from

$myRestrictedGroup = New-DistributionGroup -Name "Mail service accounts" -Type "Security" -Members @("senderemail@mydomain.com")

#3. Optionally hide the group from the address list

Set-DistributionGroup -Identity $myRestrictedGroup.Identity -HiddenFromAddressListsEnabled $true

#4. Create the application access policy to only allow sending the app mails for the specified distribution group

$params = @{
     AccessRight = "RestrictAccess"
     AppId = $myAppId
     PolicyScopeGroupId = $myRestrictedGroup .PrimarySmtpAddress
     Description = "Restrict I2A Sender Mail app permissions to only allow access to service account"
}

New-ApplicationAccessPolicy @params
From this point, the application “I2A Mail Sender” will be authorized only for the sender e-mail address wanted “senderemail@mydomain.com”
More information:
- Limiting application permissions to specific Exchange Online mailboxes – Microsoft Graph | Microsoft Docs
- Securely sending emails from PowerShell scripts with modern authentication enforced – nicolonsky tech
- New-ApplicationAccessPolicy (ExchangePowerShell) | Microsoft Docs
Step 3: Communicate to your Client Success Manager the email address authorized.
Your Client Success Manager will then configure the email address as the account used to send notifications to end-users and security teams.
- The email address that will be used to send emails (and the aliases)
- Application ID
- App Secret