Prerequisites for M365 environment

To enable data collection and use the alerting or the MyDataSecurity / MyDataManagement platform by your users, we invite you to fulfill the six prerequisites below.

đź’ˇ There are some differences between the requirements for MyDataSecurity and MyDataManagement. Please read carrefully the tabs below to get the right information.

💡 This tab is relevant for both MyDataSecurity and MyDataManagement configurations.

The solution uses Microsoft APIs to collect permissions and access to Exchange, OneDrive, SharePoint, and Teams.

Remediation is also carried out via the APIs.

Granting the permissions to the IDECSI-Platform app

Please send us your TenantID, your SharePoint root site URL ([yourdomain].sharepoint.com) and let us know when you have granted the app IDECSI – Platform below by clicking the following links and logging in as administrator of the tenant:

https://login.microsoftonline.com/common/adminconsent?client_id=52e3a6c9-b6cc-4854-92db-06afc774da14

Application permissions details for the granted app

Here is the IDECSI – Platform application’s set of rights.
 
APIPermissionIDECSI UsageMore?
Office 365 Management APIActivityFeed.ReadCollect audit logs to display access events in MyDataSecurity.
Detect changes in rights and permissions to be able to recollect the resources, and also alert if needed.
Office 365 Management Activity API reference | Microsoft Learn
 Graph APIAuditLog.Read.All Collect unified audit logs and Entra audit logs to enrich all Idecsi’ Resource’s information.  
Graph APIChannelSettings.Read.AllMap Teams channels (private and shared) to be displayed in MyDataSecurity.
List channels – Microsoft Graph v1.0 | Microsoft Learn
Graph APIChannel.Delete.AllPerform remediation on a private or shared Teams channel from MyDataSecurity.
Get conversationMember – Microsoft Graph v1.0 | Microsoft Learn
Remove member from channel – Microsoft Graph v1.0 | Microsoft Learn
Graph APIChannelMember.ReadWrite.AllIdentify channel members and remediate a member directly from MyDataSecurity.
Delete channel – Microsoft Graph v1.0 | Microsoft Learn
Graph APIDelegatedPermissionGrant.ReadWrite.AllIdentify and remediate delegated permissions through the Application tab in MyDataSecurity.Delete oAuth2PermissionGrant (a delegated permission grant) – Microsoft Graph v1.0 | Microsoft Learn
Graph APIDirectory.Read.AllIdentify users, groups, and applications to display this information in MyDataSecurity.Required for AD information (users, groups, licenses, applications, administrators)
Graph APIUser.Read

Authenticate users for MyDataSecurity (SSO).

Delegated Permission for SSO

Graph APIUsers.Read.All

Associate the user’s profile picture with their IDECSI interfaces.

Required to get the user’s profile picture

Graph APIFiles.ReadWrite.AllPerform version and file remediations through MyDataManagement and remediate sharing permissions in MyDataSecurity.Remove access to an item – Microsoft Graph v1.0 | Microsoft Learn
Delete permission – Microsoft Graph v1.0 | Microsoft Learn
Graph APIGroup.ReadWrite.AllRemediate groups (owners, members, guests), modify privacy settings (public/private), or delete them.Remove member – Microsoft Graph v1.0 | Microsoft Learn
Remove group owner – Microsoft Graph v1.0 | Microsoft Learn
Add owners – Microsoft Graph v1.0 | Microsoft Learn
Update group – Microsoft Graph v1.0 | Microsoft Learn
Delete group – Microsoft Graph API – Microsoft Graph v1.0 | Microsoft Learn
Graph APIInformationProtectionPolicy.Read.AllRetrieve sensitivity label configurations (Purview).List sensitivityLabels – Microsoft Graph beta | Microsoft Learn
Graph APIMailboxSettings.ReadAdapt language and settings for the IDECSI interface and identify the mailbox associated with a user.Get user mailbox settings – Microsoft Graph v1.0 | Microsoft Learn
Graph APIPolicy.Read.AllRead tenant configurations and alert in case of changes.Required to read configurations
Graph APIReports.Read.AllCollect various reports to enrich information in MyDataSecurity and MyDataManagement.reportRoot: getOneDriveUsageStorage – Microsoft Graph v1.0 | Microsoft Learn
reportRoot: getOneDriveUsageFileCounts – Microsoft Graph v1.0 | Microsoft Learn
reportRoot: getSharePointSiteUsageStorage – Microsoft Graph v1.0 | Microsoft Learn
reportRoot: getSharePointSiteUsageFileCounts – Microsoft Graph v1.0 | Microsoft Learn
SharePointSites.FullControl.AllCollect (classic site administrators) and correct permissions (Everyone site admin, EEEU site admin, Everyone, EEEU) on SharePoint sites, and retrieve the sharing link creator and creation date.SharePoint admin APIs authentication and authorization | Microsoft Learn
Graph APISites.Read.AllMap sites, libraries, permissions, and metadata used to populate user profiles in MDS/MDM.List sites – Microsoft Graph v1.0 | Microsoft Learn
Graph APITeamSettings.Read.AllMap Teams teams and their settings to populate user profiles in MDS.Get team – Microsoft Graph v1.0 | Microsoft Learn
 Office 365 Exchange Online APIExchange.ManageAsApp

Permission that grants no rights to the application itself. The associated service principal will receive collection and remediation rights (via PowerShell) depending on the assignment.

Authenticate an EWS application by using OAuth

Application Access Policy Support Added to Exchange Web Services in Exchange Online

Role-Based Access Control for Applications in Exchange Online

More information on permissions: Overview of Microsoft Graph permissions – Microsoft Graph | Microsoft Learn

Providing rights on Exchange

The “Manage Exchange as Application” right allows connecting as an application but does not grant any specific permissions. That is why we need to add a “Service Principal” that will enable its use. To limit rights, we will create an I2A Role Group, where we will place the “Service Principal”.

⚠️ Please note:

  • Install or update PowerShell to version 7 (winget install --id Microsoft.Powershell --source winget)
  • Launch PowerShell 7 as the local administrator of the machine (or with an account that has the required rights)
  • Install the Microsoft.Graph module (Install-Module Microsoft.Graph -Verbose)
  • Install the ExchangeOnlineManagement module version 3.6 (Install-Module -Name ExchangeOnlineManagement -RequiredVersion 3.6.0 -Verbose).
# Import ExchangeOnline module and Graph module
Import-Module ExchangeOnlineManagement;Get-Module ExchangeOnlineManagement
Import-Module Microsoft.Graph;Get-Module Microsoft.Graph

# Load and connect to Microsoft Graph with administrator rights.
Connect-MgGraph -Scopes AppRoleAssignment.ReadWrite.All,Application.Read.All

# Retrieve the Service Principal corresponding to the "IDECSI - Platform" application.
$AzureADApp = Get-MgServicePrincipal -Filter "DisplayName eq 'IDECSI - Platform'"

# Exchange Online Connexion
# This prompts for user credentials. Please use an Exchange Admin account to connect.
Connect-ExchangeOnline

# Create an Exchange Service Principal linked to the Azure AD App
New-ServicePrincipal -AppId $AzureADApp.AppId -ObjectId $AzureADApp.Id -DisplayName "SP for Azure AD App IDECSI - Platform"

# Retrieve the new Service Principal object
$SP = Get-ServicePrincipal -Identity "SP for Azure AD App IDECSI - Platform"
Write-Host ($SP | Format-Table | Out-String)

# Define variables
# These variables store:
# * The name of the role group
$roleGroupName = "I2A"
# * The names of custom management roles to be created.
$roleName = "Mail Recipients - ViewOnly - I2A"
$roleName1 = "Remediation - I2A"
$roleName2 = "Remediation 2 - I2A"

# Create Role: "Mail Recipients - ViewOnly - I2A"
# Creates a new management role based on the "Mail Recipients" parent role.
New-ManagementRole $roleName -Parent "Mail Recipients"
Get-ManagementRoleEntry ($roleName + "\*")
$data2 = Get-ManagementRoleEntry ($roleName + "\*")
# This loop removes all cmdlets except those starting with "Get", effectively making the role read-only.
foreach($data in $data2)
{
$name = ""
$name = $data.Name
if($name -NotLike "Get*")
{
Remove-ManagementRoleEntry $roleName\$name -confirm:$false
Write-Host ("Done for $name")
}
}

# Create Role: "Remediation - I2A"
# Creates another role based on "Mail Recipients".
New-ManagementRole $roleName1 -Parent "Mail Recipients"
Get-ManagementRoleEntry ($roleName1 + "\*")
$entries = Get-ManagementRoleEntry ($roleName1 + "\*")
# This time, it keeps only specific "Remove" cmdlets (like Remove-MailboxPermission, etc.), making the role strictly focused on remediation tasks, like removing permissions or inbox rules.
foreach($entry in $entries)
{
$name = ""
$name = $entry.Name
if ($name -NotLike "Remove-MailboxPermission" -And $name -NotLike "Remove-InboxRule" -And $name -NotLike "Remove-MailboxFolderPermission" -And $name -NotLike "Remove-RecipientPermission" -And $name -NotLike "Remove-ADPermission")
{
Remove-ManagementRoleEntry $roleName1\$name -Confirm:$false
Write-Host ("Done for $name")
} 
}

# Create Role: "Remediation 2 - I2A"
# Creates a third custom role based on "Mail Recipient Creation".
New-ManagementRole $roleName2 -Parent "Mail Recipient Creation"
Get-ManagementRoleEntry ($roleName2 + "\*")
$entries = Get-ManagementRoleEntry ($roleName2 + "\*")
# This removes all cmdlets except Set-MailboxFolderPermission, allowing the role to only modify folder permissions, again focusing on a specific remediation use case.
foreach($entry in $entries)
{
$name = ""
$name = $entry.Name
if ($name -NotLike "Set-MailboxFolderPermission")
{
Remove-ManagementRoleEntry $roleName2\$name -Confirm:$false
Write-Host ("Done for $name")
} 
}

Get-ManagementRoleEntry ($roleName + "\*")
Get-ManagementRoleEntry ($roleName1 + "\*")
Get-ManagementRoleEntry ($roleName2 + "\*")

# Assign Roles to Role Group and Add Service Principal
# Creates a new role group named "I2A", includes:
# * Standard built-in roles (like audit and read-only)
# * The 3 custom roles we created
# * Assigns everything to the Service Principal
New-RoleGroup -Name $roleGroupName -Roles "Audit Logs","View-Only Configuration","View-Only Recipients",$roleName,$roleName1,$roleName2 -Members $SP.Identity

# Disconnect
# Ends the Exchange Online and Graph session properly.
Disconnect-ExchangeOnline
Disconnect-Graph

Once the application is granted and the script ran successfully, please let your Customer Success Manager know it.

đź’ˇ This tab is relevant for both MyDataSecurity and MyDataManagement configuration.

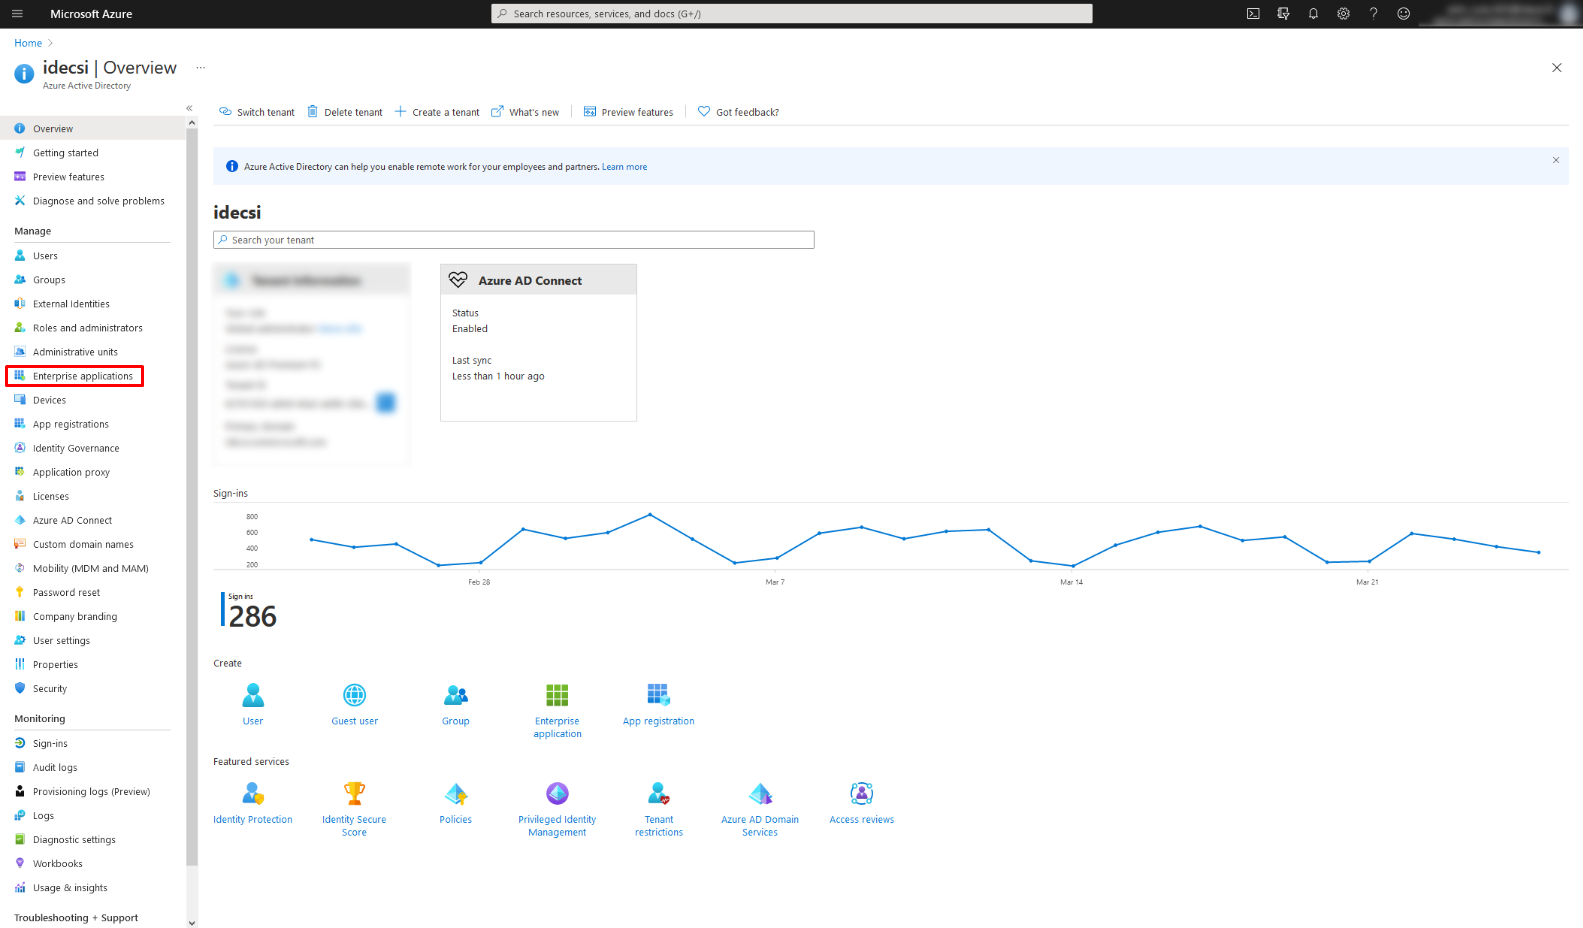
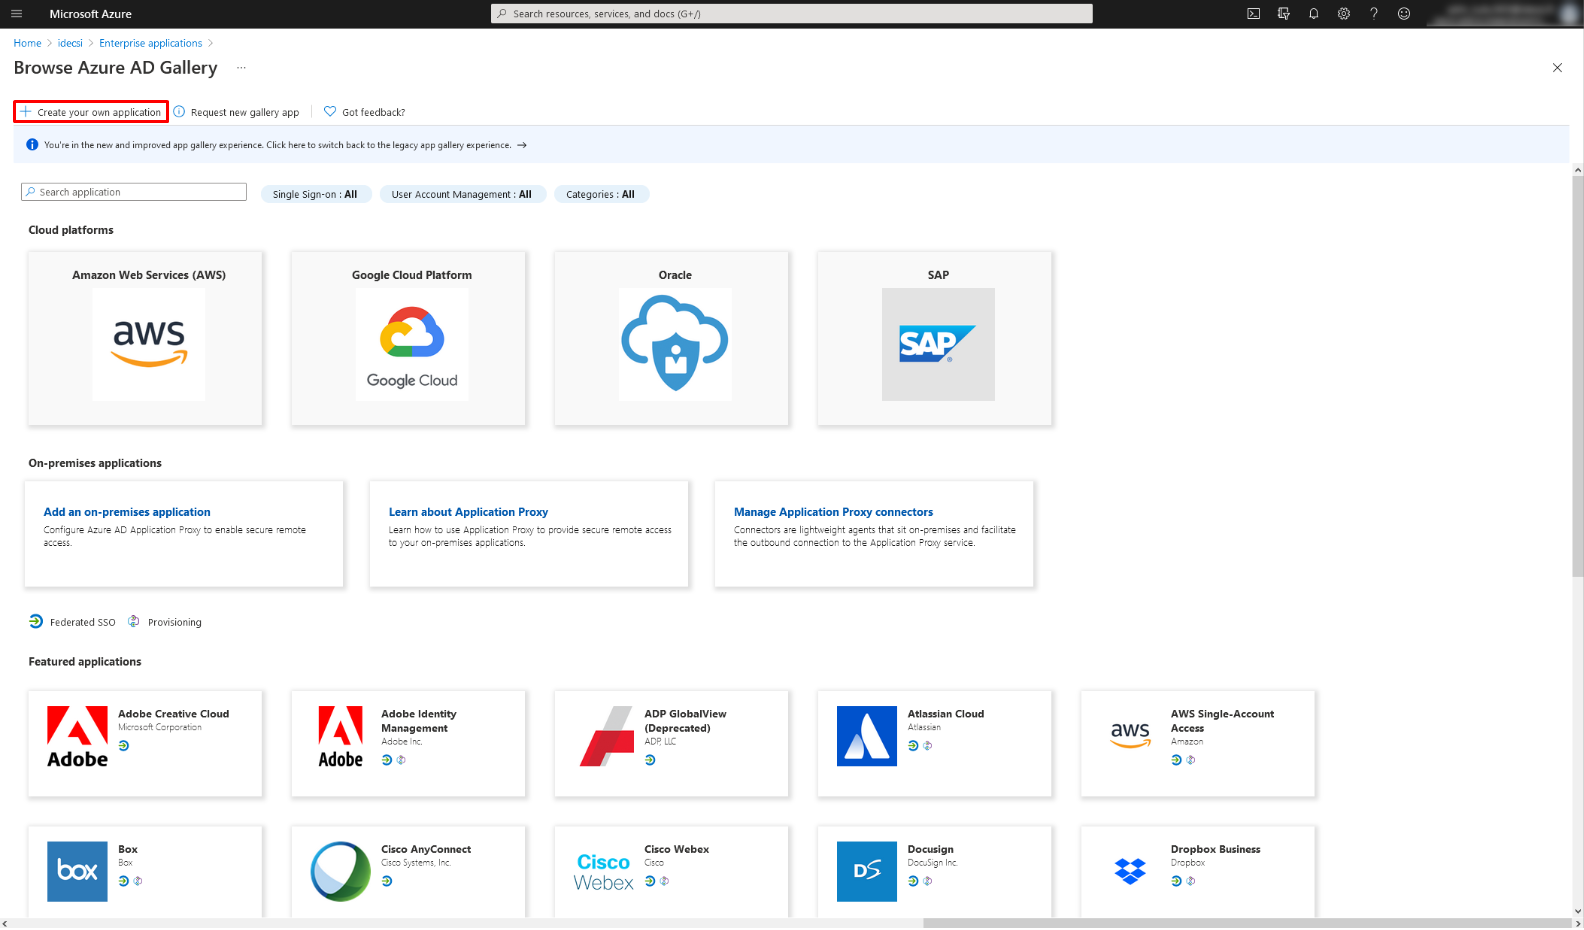
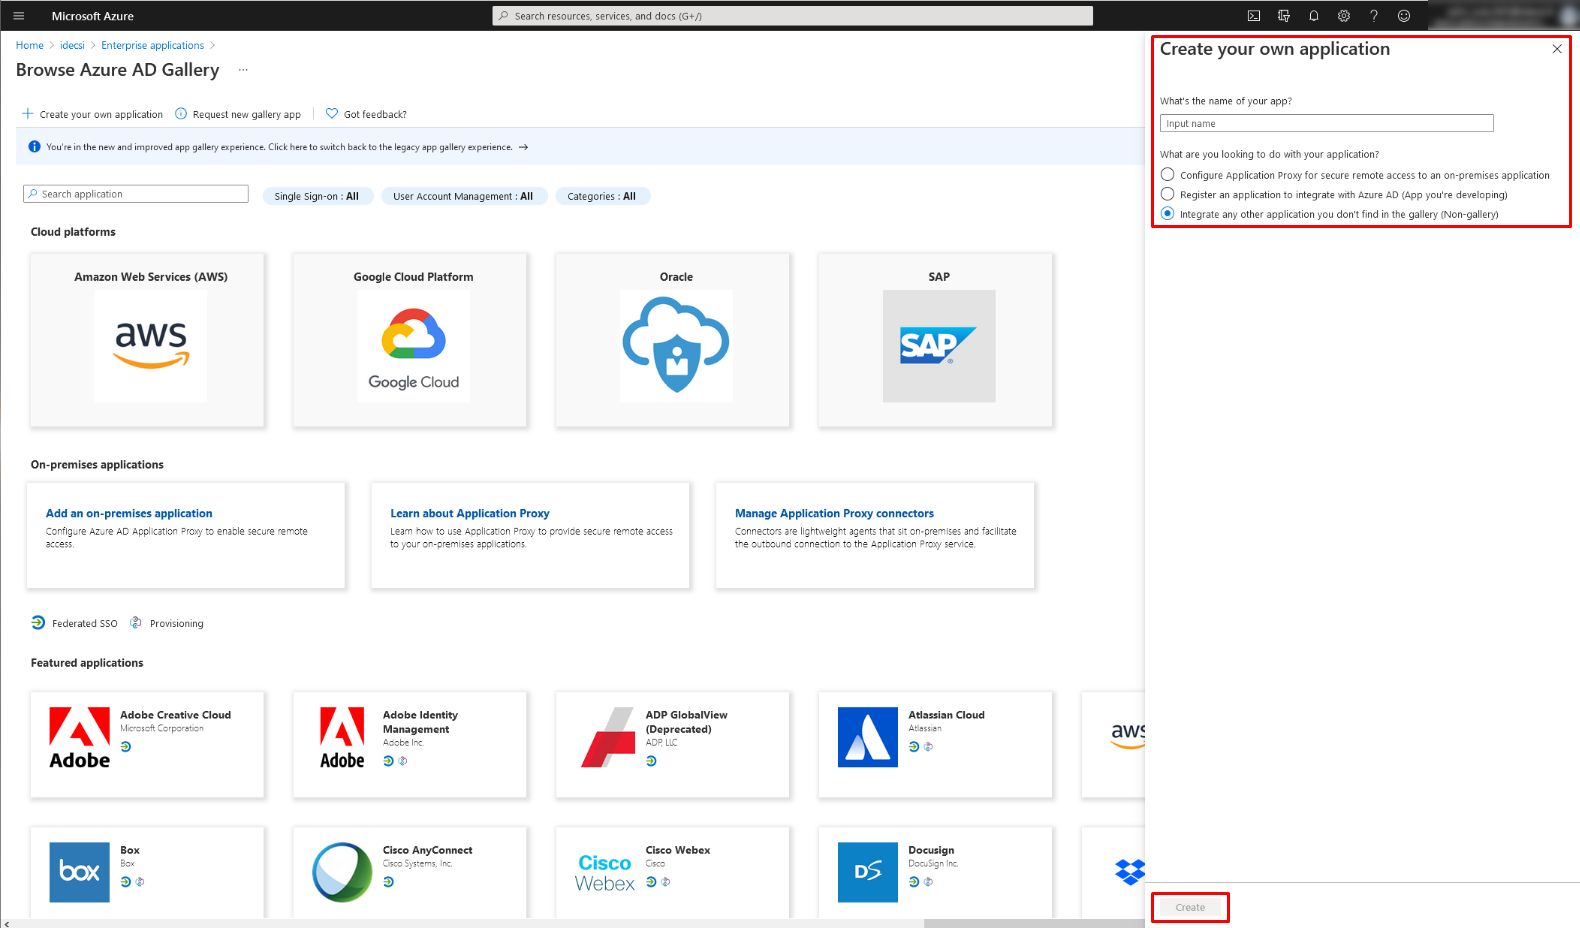
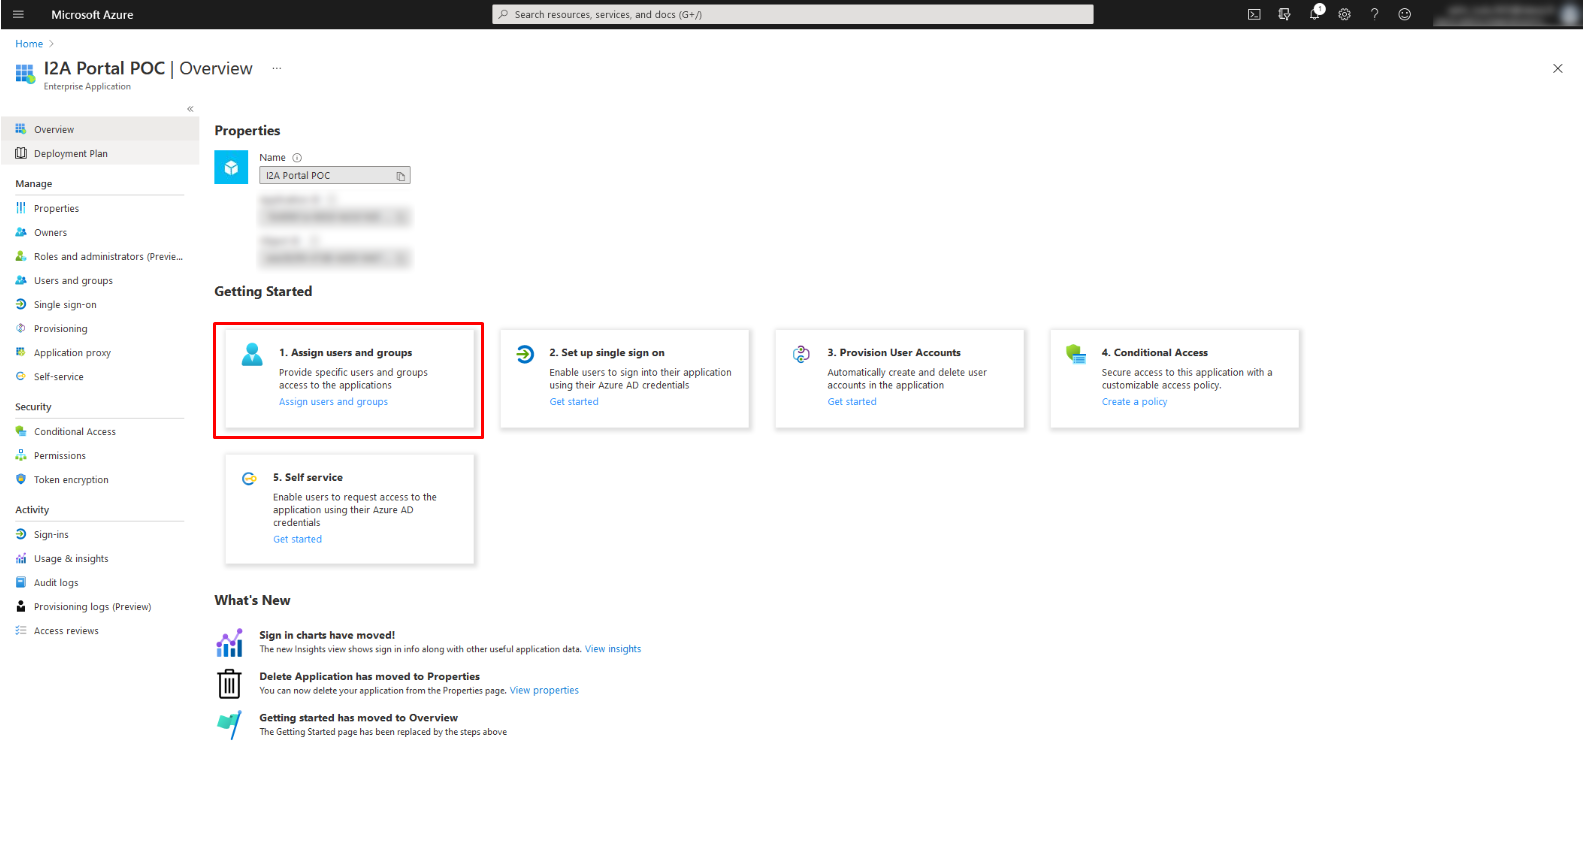
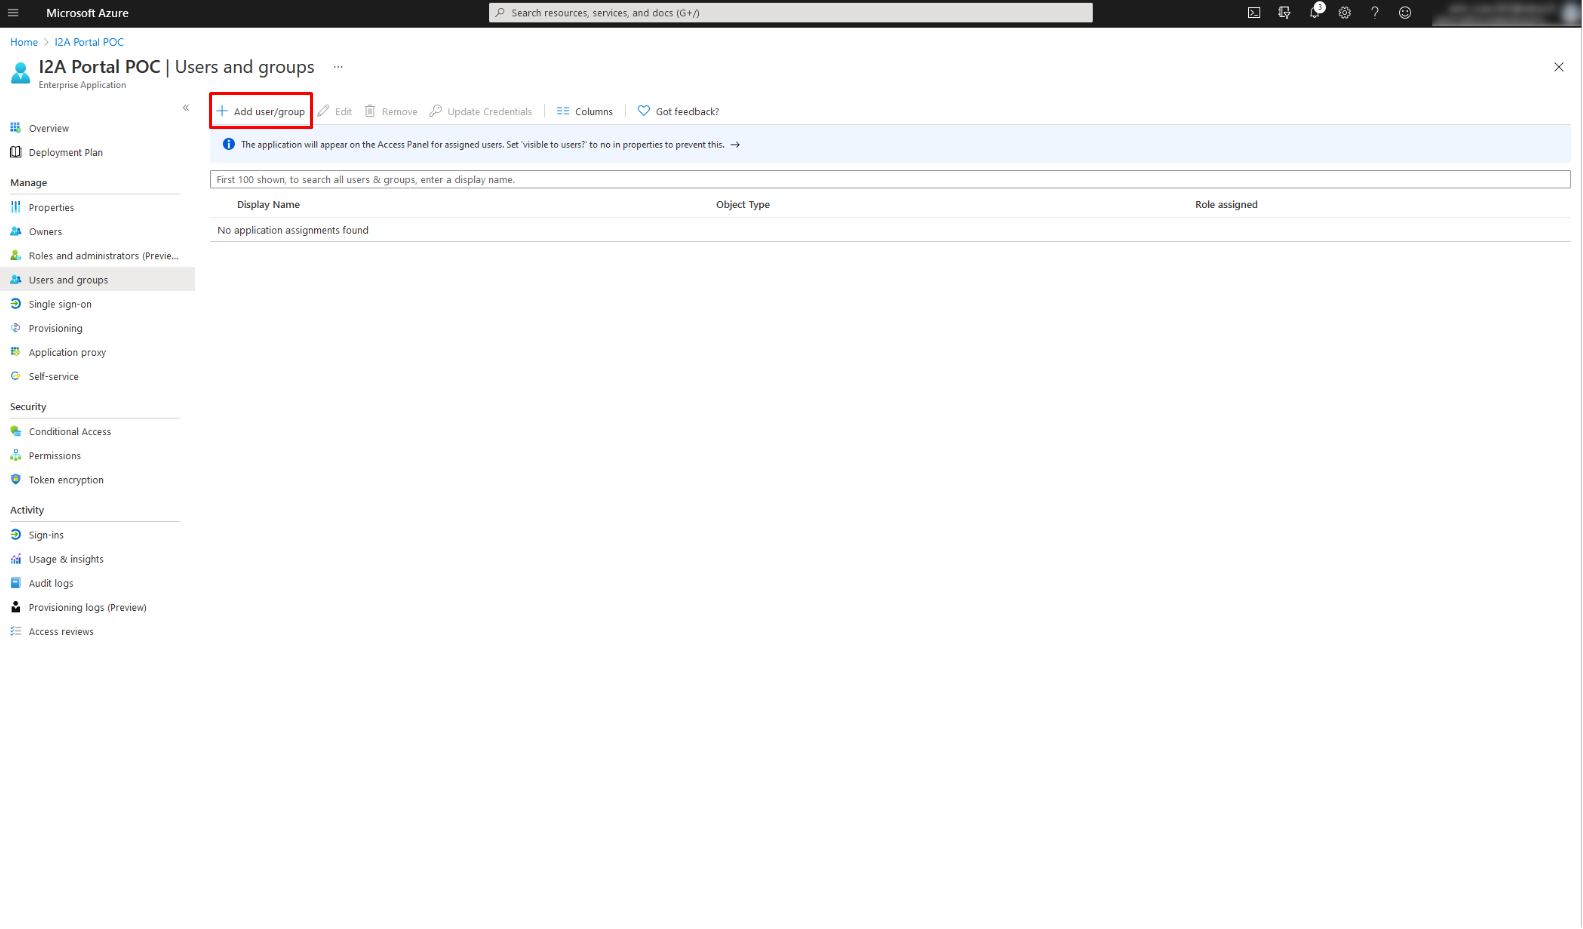
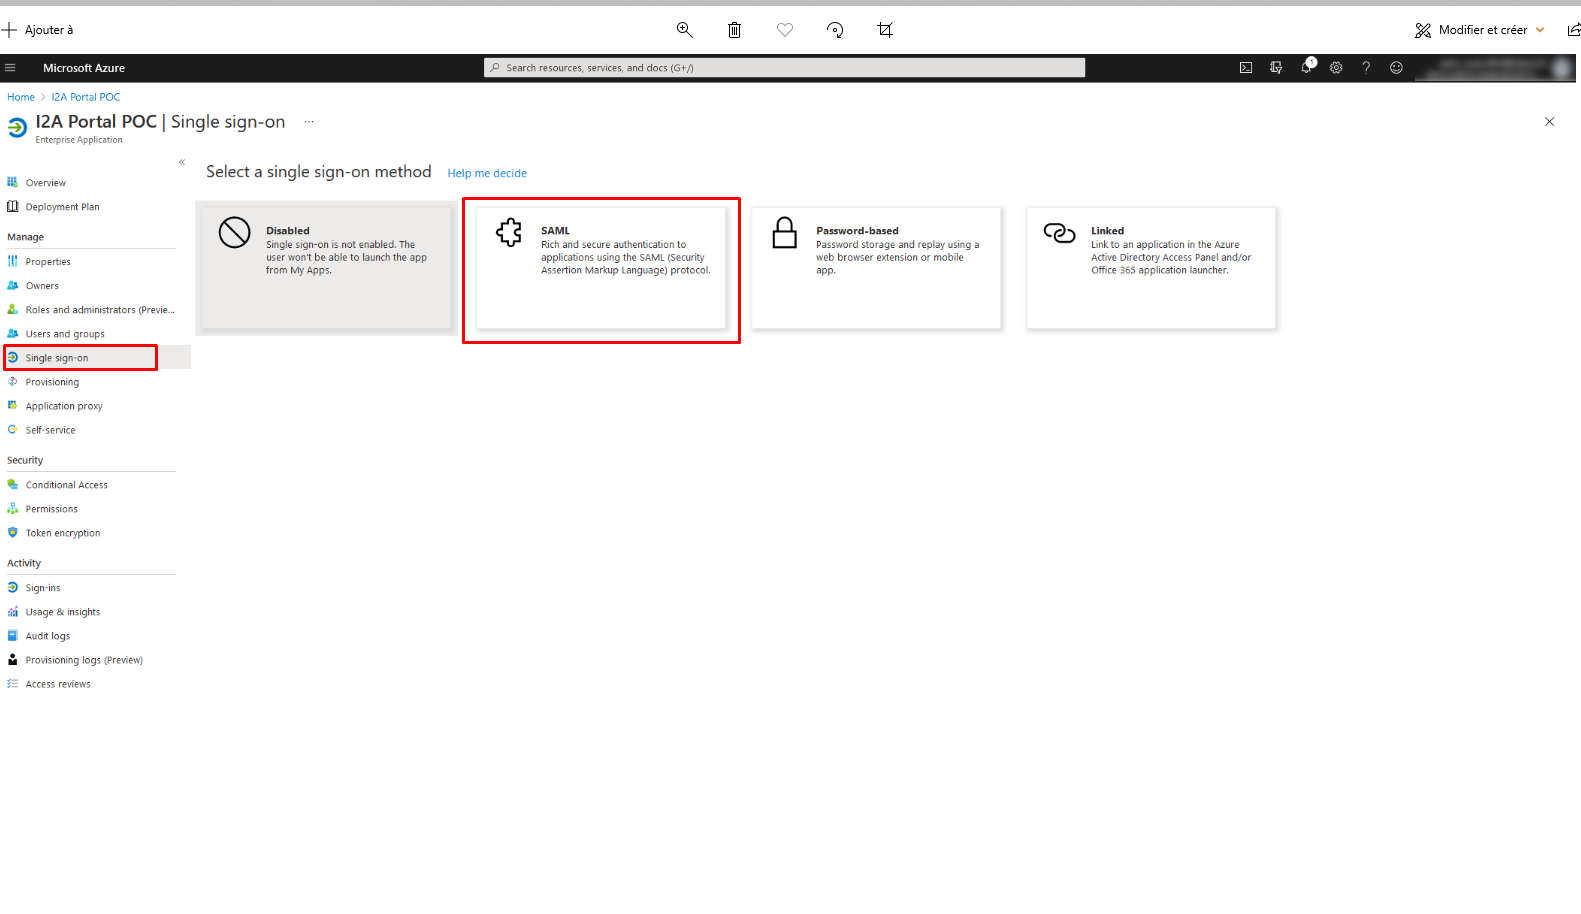
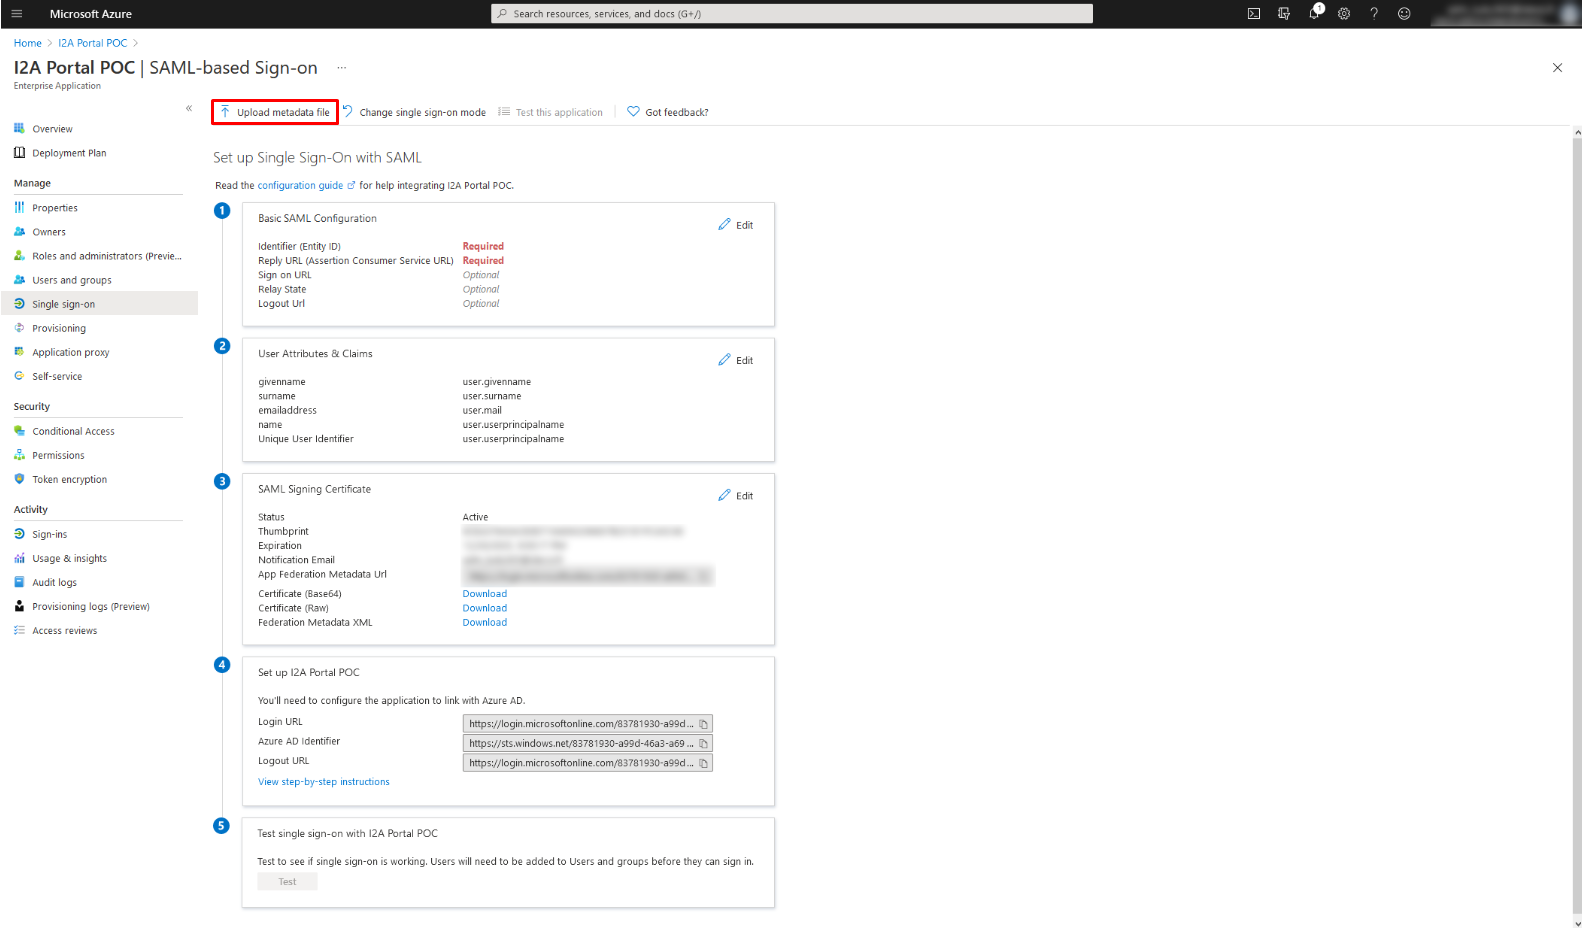
To enable users to connect to their MyDataSecurity or MyDataManagement, we can integrate your identity federation. Below is the procedure with Azure AD. For other solutions, please consult the knowledge base.

1. Go to your administrator Dashboard in Azure Active Directory
and click on Active Directory > Enterprise Applications
2. Click + Create your own application
Type a relevant name in Input Name (ie I2A Platform), select the “Integrate any other application you don’t find in the gallery (non-gallery)” option, and click Create.
3. After this, you’re redirected to the newly created application Overview, go to Assign users and groups from the tile or the side menu.
4. If you want to restrain the usage, you can add users and/or groups you want to access the I2A platform. We recommend adding a group with all your tenant users, I2A will recognize the users with an account.
5. Go to Single sign-on from the side menu and select SAML as the single sign-on method.
6. Click on Upload metadata file and select the XML file provided by your Client Success Manager.
7. After the import, you’ll have:

In the Basic SAML configuration block:

Identifier (Entity ID): https://dcxx-auth.i-2a.com
Reply URL (Assertion Consumer Service URL): https://dcxx-auth.i-2a.com/tenants/YourTenant/federations/saml/assertion-consumer-service

You can now test your authentication using the Test button.

8. Please send us the Federation metadata XML file to clientsuccess@idecsi.com

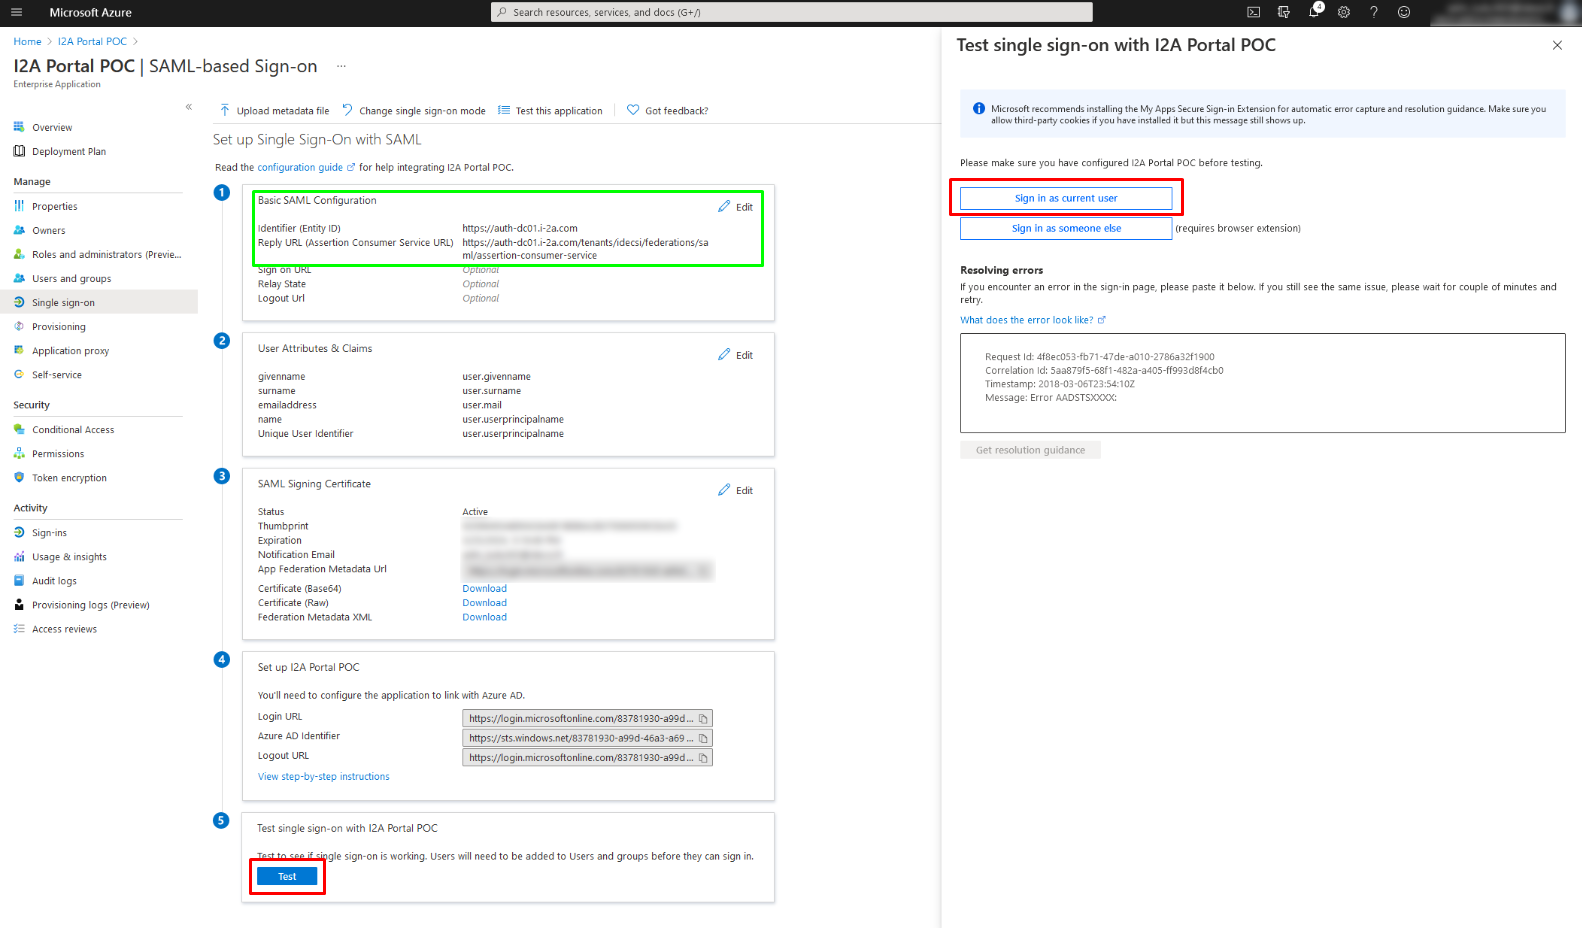
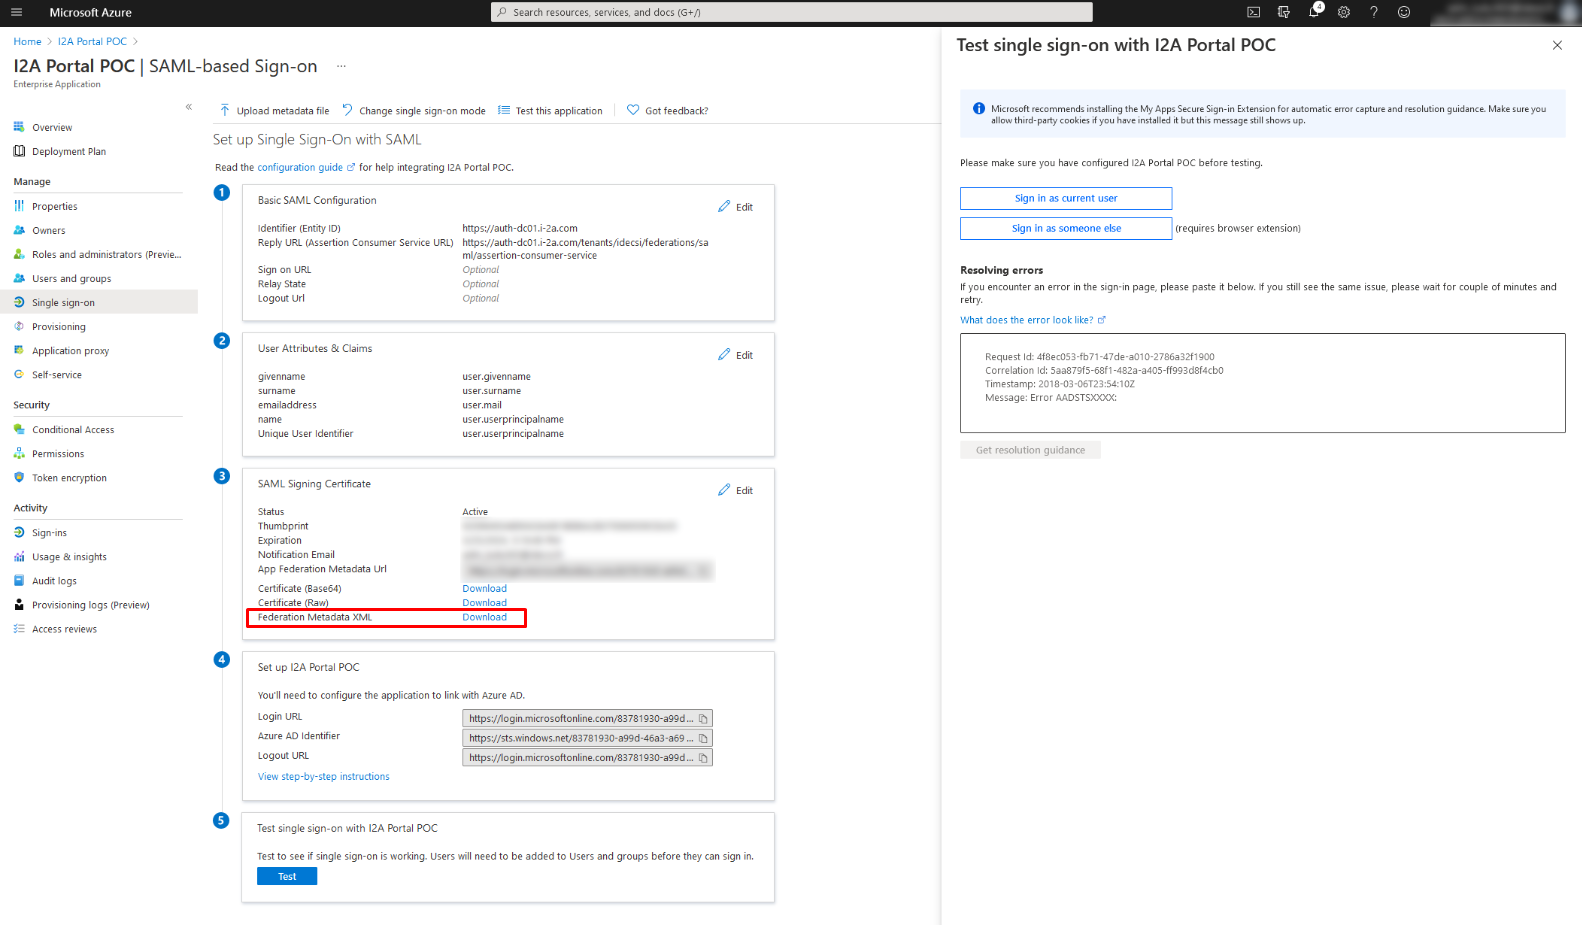
Your Client Success Manager will inform you after your metadata has been integrated.

đź’ˇ This tab is relevant for both MyDataSecurity and MyDataManagement configurations.

To collect your users’ information and attach their resources, we have to set up a request based on your Azure Directory content. This request allows us to automatically import the necessary data.

The request can be based on two types of information to filter the appropriate scope of users:

  • AD Attributes configured for each user. The most common attributes used for the request are the Microsoft License Plans’ SkuIDs.
  • One or more AD Groups containing the users

To proceed with the request setup, please provide your Client Success Manager with the relevant type of information (attribute or group). If needed, your Client Success Manager will be happy to assist you with this process.

Anonymous reporting

Microsoft reports shows anonymous user names instead of actual user names. Those reports are required for MyDataManagement collects, but the user identity is required in order to show him information about his data on his MyDataManagement profile.

This setting is also required to display Microsoft 365 Groups data in the MyDataSecurity BI dashboard.

Therefore, it is mandatory to deactivate the anonymous reporting on your tenant.

To do so, please follow the tutorial here.

 💡 This tab is relevant for both MyDataSecurity and MyDataManagement configurations.

To encourage users to adopt the solution, we propose using an application that will enable our platform to send emails from your Microsoft tenant. If not, IDECSI will use Graph API to send emails from a generic address (alerts@idecsi.com).

If you want to use a specific email address of your domain, we can use the Microsoft Graph API to send IDECSI emails through an application granted on your tenant. You need to use an account from your tenant with at least a licence including Microsoft Exchange Online P1 or P2.

âš  Mailing lists are not supported.

Depending on the number of recipients you plan to target through your campaigns, you will need to use Microsoft’s  High volume email (HVE) service.

HVE: For 5 000 to more than 150 000 recipients

What is HVE (High Volume Email)?

HVE is a Microsoft solution designed to support high-volume email sending from a Microsoft 365 tenant, while staying within the platform’s performance and security thresholds. It is particularly recommended for organizations with a large number of users or with regular bulk-sending needs (such as notifications, newsletters, etc.).
 

Step 1: Create your HVE account

To send emails via HVE, you’ll need to create a dedicated email-sending account. Two options are available:
  • Via the Microsoft 365 Admin Center: Manually create a dedicated user. 
  • Via PowerShell: Automate the process
Please, see Microsoft’s official documentation: Create an HVE account: Manage high volume emails for Microsoft 365 in Exchange Online Public preview | Microsoft Learn
Once this step is completed, you can move on to the admin consent step.
 

Step 2: Grant Consent

To follow Microsoft’s best practices, we recommend using an Azure AD registered application with delegated OAuth permissions to send emails via this account.
Consent must be granted from the HVE account.
To proceed with the consent:
  1. Please, open a private navigator page
  2. Go to: IDECSI Platform HVE
  3. Sign in with your HVE account 
  4. You will see a consent request screen for the application
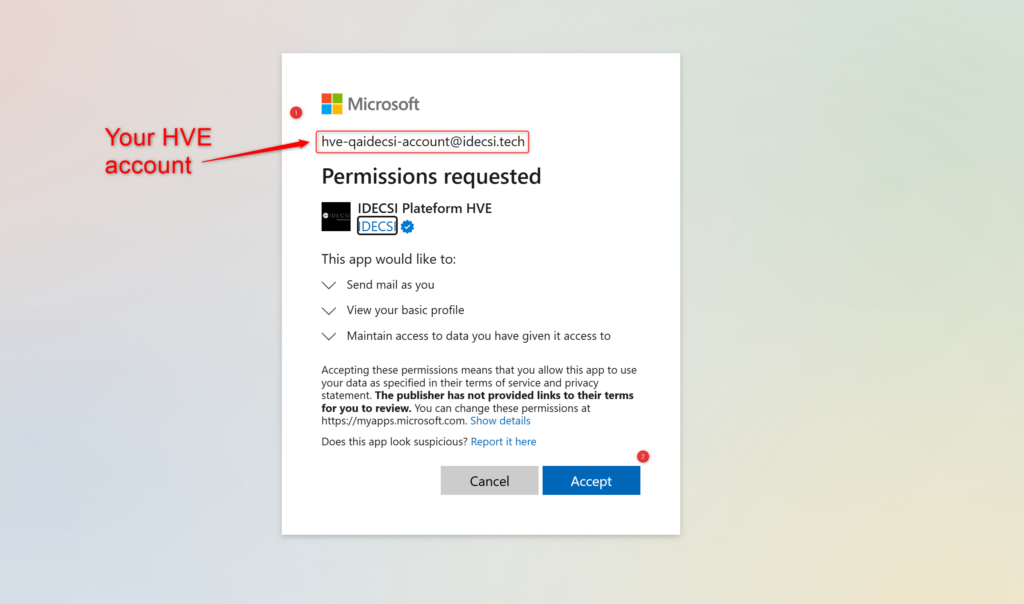
  1. Click “Accept” to approve 
  2. Once completed, please share the account’s email address and password with your IDECSI Customer Success Manager contact.

Step 3: App Integration in “Identities” (handled by IDECSI)

Your Customer Success contact will notify you as soon as the connection has been successfully validated.
 

Step 4. Sending Test

For the Sending Test, your Customer Success Manager will configure a test campaign and keep you informed.


Classic: For 1 to 4 999 recipients

IDECSI proposes to use the generic application “I2A Mail Sender” to send notifications.

The application used to send notifications cannot be the same as the one used for the remediation, as the permission “Mail.Send” must be scoped on the account.

Step 1: Grant permission to this application

The following step is to grant the application Global Administrator rights. Here is the link to grant the generic IDECSI-managed app

https://login.microsoftonline.com/common/adminConsent?client_id=ba28a8f5-601a-4523-a7e9-570dc40d49d7

The only permission to be granted is:

PermissionDisplay StringDescriptionAdmin Consent required
Mail.SendSend mail as a userAllows the app to send mail as users in the organizationYes

More information on the permission: Microsoft Graph permissions reference – Microsoft Graph | Microsoft Docs

Step 2: Enforce a restriction policy to limit the scope of the permission

To guarantee the best possible security, and to limit the permissions of the application granted in step 2, it is necessary to limit the right to send mail to a single service account used for this purpose.

For this, it is necessary to create an ApplicationAccessPolicy.

#0. Select the application you want to configure:

$myAppId = {my app id}

#1. Connect to Exchange Online with the ExchangeOnlineManagement PowerShell module

Connect-ExchangeOnline

#2. Create a mail-enabled security group that contains all the accounts you want to send mails from

$myRestrictedGroup = New-DistributionGroup -Name "Mail service accounts" -Type "Security" -Members @("CHOSEN EMAIL ADDRESS")

#3. Optionally hide the group from the address list

Set-DistributionGroup -Identity $myRestrictedGroup.Identity -HiddenFromAddressListsEnabled $true

#4. Create the application access policy to only allow sending the app mails for the specified distribution group

$params = @{
     AccessRight = "RestrictAccess"
     AppId = $myAppId
     PolicyScopeGroupId = $myRestrictedGroup.PrimarySmtpAddress
     Description = "Restrict I2A Sender Mail app permissions to only allow access to service account"
}

New-ApplicationAccessPolicy @params

From this point, the application “I2A Mail Sender” will be authorized only for the sender e-mail address wanted, “senderemail@mydomain.com”

More information:

Step 3: Communicate to your Client Success  Manager the email address authorized.

Your Client Success Manager will then configure the email address as the account used to send notifications to end-users and security teams.

    • The email address that will be used to send emails (and the aliases)

đź’ˇ This tab is relevant for both MyDataSecurity and MyDataManagement configuration.

To encourage user adoption, we propose using a personalized URL to access our platform. Without customization, the URL will look like this: https://dc01.i-2a.com/app/my-data-security/tenants/xxxxxxxxxx/dashboard

How to customize the URL?

  • Choose the desired URL and create the corresponding entry on your DNS
  • Provide us with the chosen domain name
  • Provide us with the corresponding SSL certificate and the private key (.pem format if possible)

We will let you know when the redirection to your URL is done, and give you the CNAME or A information for the DNS entry.